When you have an account with TallyEdge, banks or any financial institutions (FIUs) can request your consent to access your financial data. Once approved, the banks and institutions where you hold accounts (FIPs) linked with your VUA will share the necessary details with FIUs via TallyEdge. You can review the purpose, period, time window, and frequency of data sharing before approving any request. Consents ensure your financial information is shared only with authorised FIUs, and end-to-end encrypted data is transferred securely through TallyEdge.
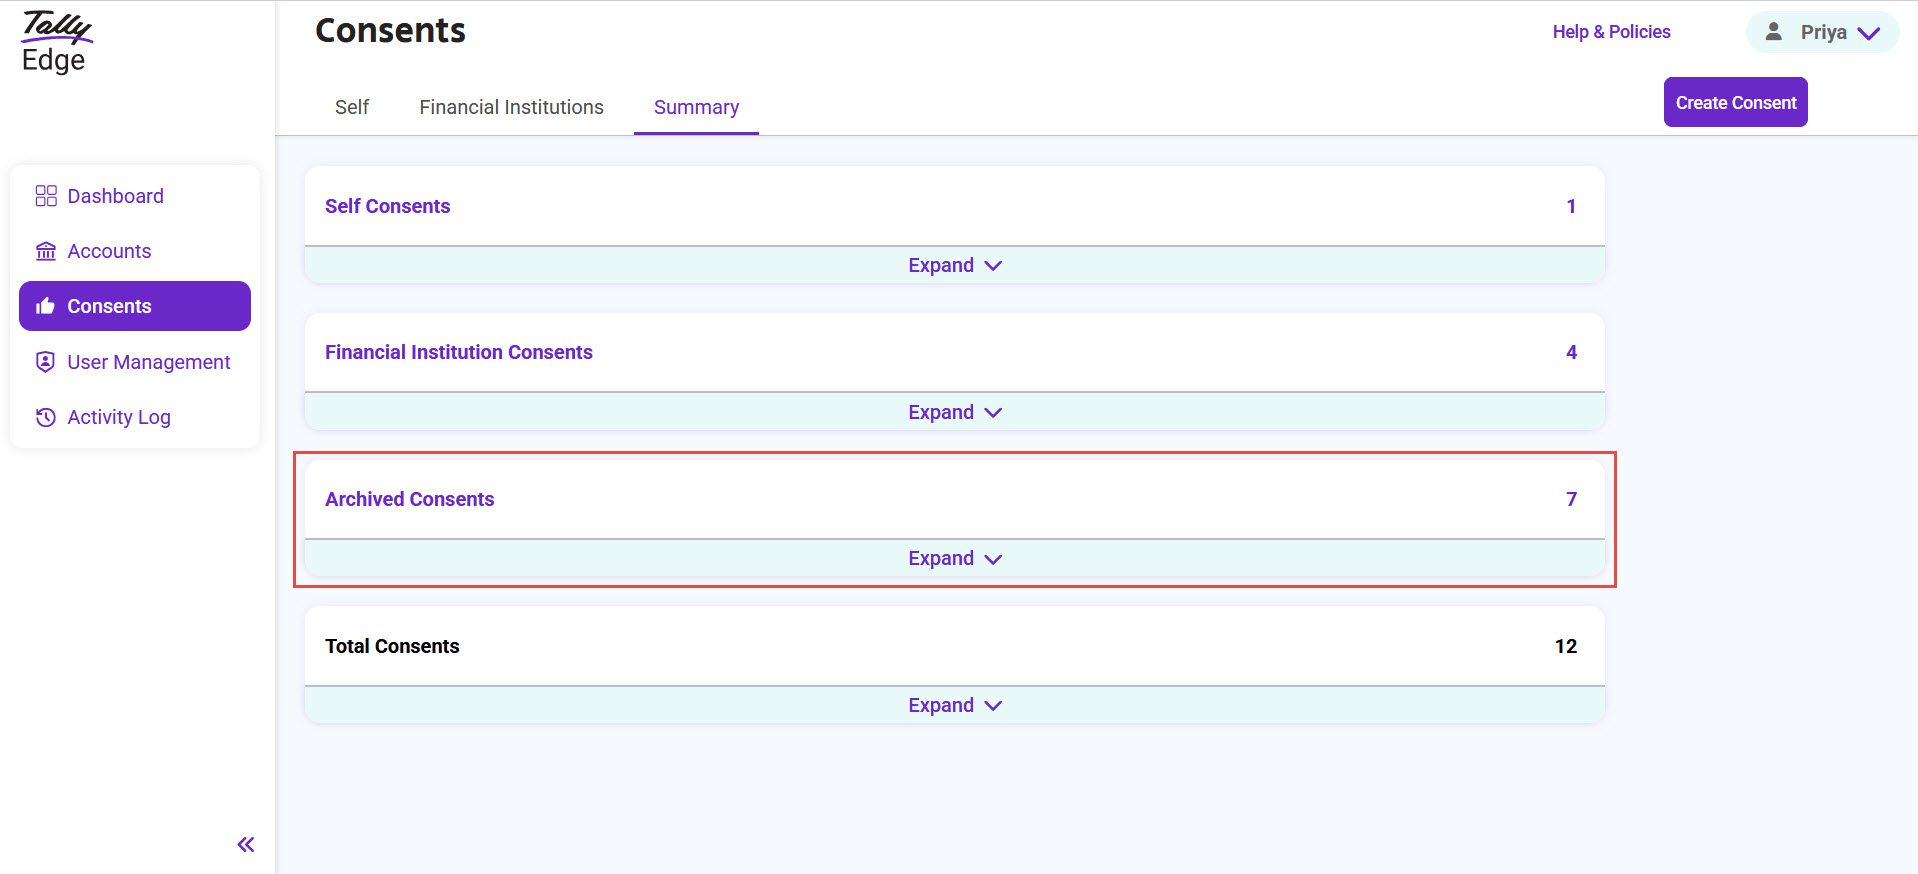
In TallyEdge, consents are classified as Self Consents and Financial Institution Consents.
- Self Consents: The consents you create will be accessible in this section.
- Financial Institution Consents: This section contains consents issued by financial institutions.
TallyEdge maintains the status and category of every consent.
- Pending: All the requests that come from FIUs for your approval are listed in the Financial Institution Consents. Consent Requests that you created and did not approve, are listed in the Self Consents section. You may approve or reject the request as needed.
- Active: Once you approve self and FIU consent requests, the consent becomes active for the duration specified in the consent request.
- Archived Consents: All consents that are expired, rejected, or revoked are listed in the Summary section.
Read this page to learn how to view the consent requests sent to you for approval, take action, change the status of each consent as per your needs, and view details of archived consents and the accounts linked to such consents.
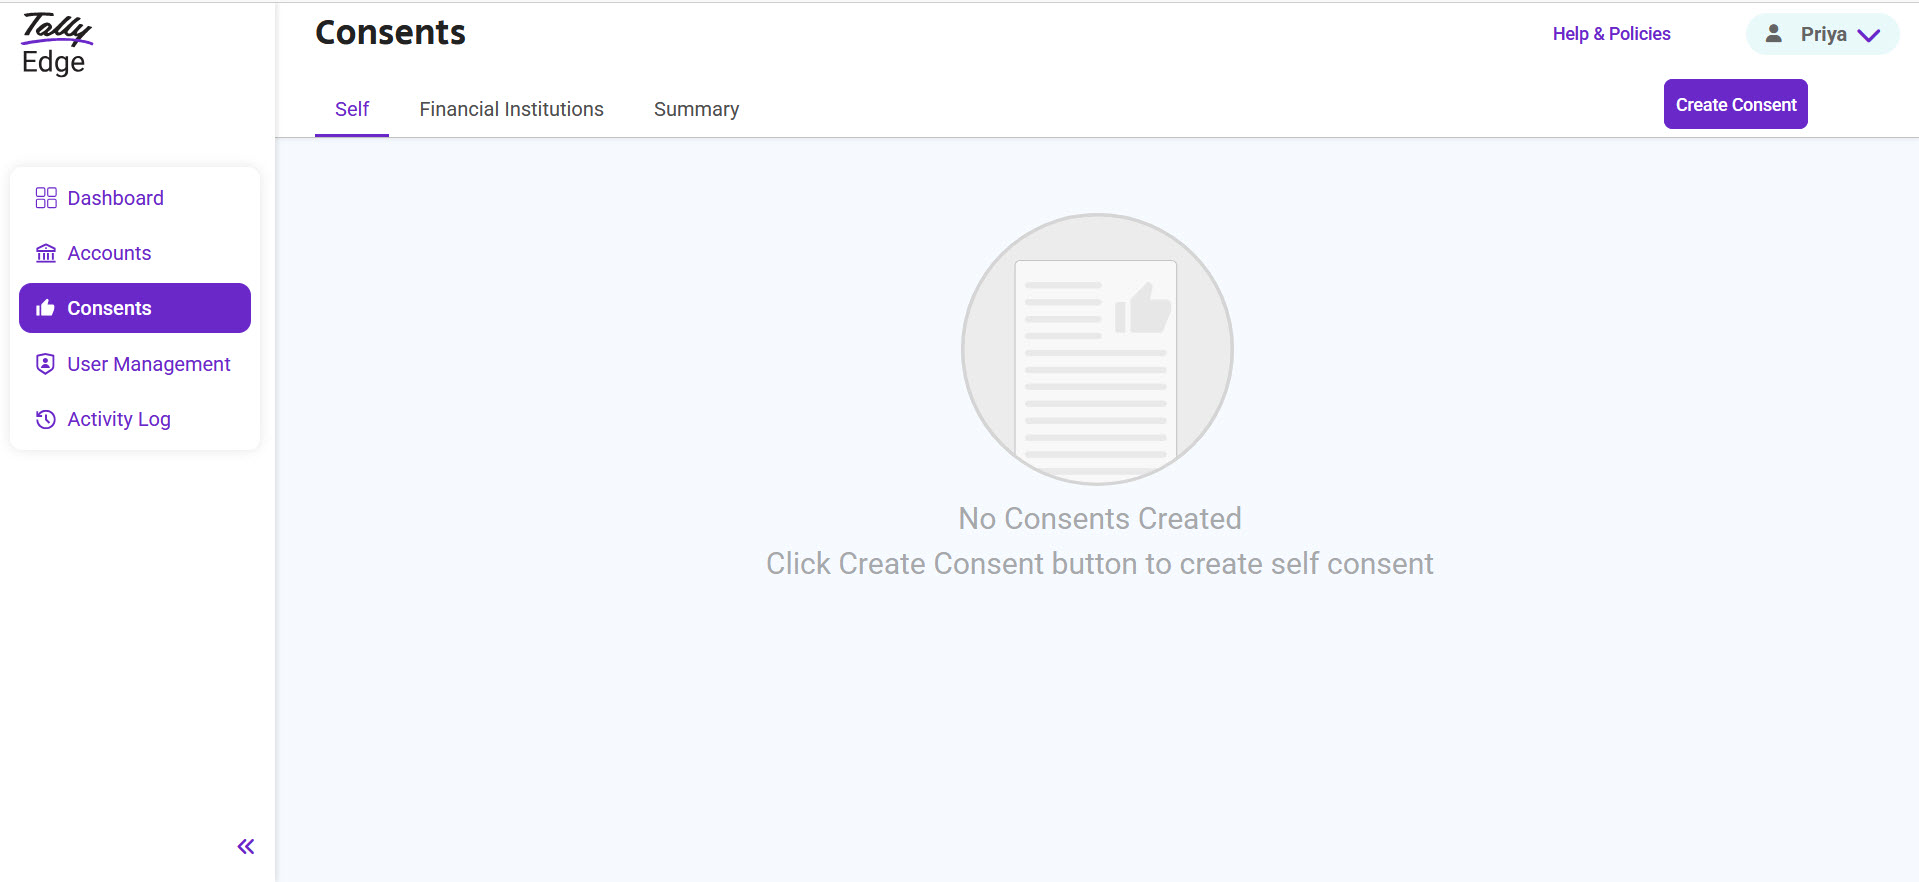
Self Consents
You can use a TallyEdge account to aggregate data from your accounts with many FIPs so that you can check your financial health and plan your investments better. For this you can create a consent request to gather data from various FIPs.
Create Consent for Yourself
A consolidated balance statement of your linked accounts will be available for you to check your financial status. You can create a consent for your requirement with your financial institutions.
- Select Consents > Create Consent.
Read the message and click Proceed.
- Select the Financial Institution Type as required.
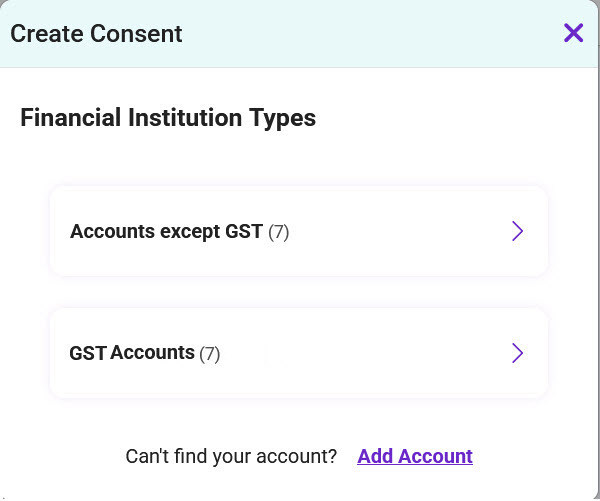
- Accounts except GST: Select Financial Institution Type if you don't have a GST account.
- GST Accounts: Select it if you want create the consent for your GST account only.
- Select the linked FIP accounts as required and click Next.
- On Create Consent screen, select the required parameters.
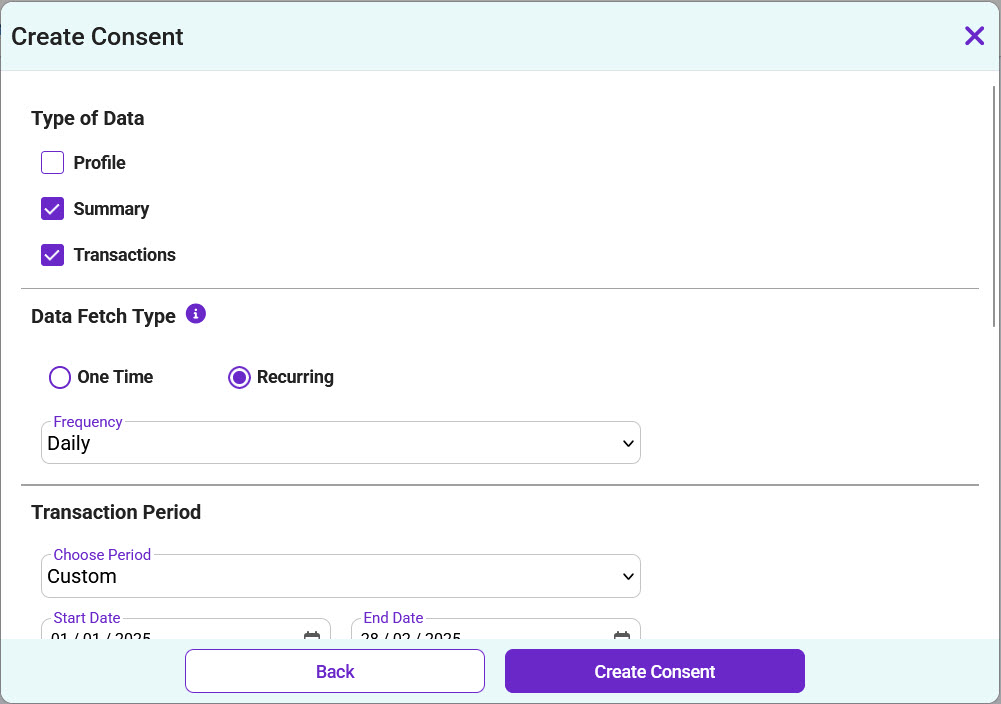
- Type of Data: Your Summary and Transactions will be fetched. These fields are auto-checked by default.
- Data Fetch Type: The frequency may be One Time or Recurring.
If you select Recurring, you have to choose the Frequency, such as Daily, Monthly, or Yearly. - Transaction Period: Transactions during this tenure will be fetched. You can Choose Period or select the period, Start Date, and End Date as required.
Note: This field will not be shown if the Transactions checkbox is not selected under the Data Type. - Consent Validity Period: Your financial information will be fetched during this tenure. Select the Start Date and End Date as required.
- Consent Name: This field is pre-filled as per the selected Type of Data. You can enter the name of the consent as needed.
- Other Details: Based on the selected type of information, accounts will be fetched to link with this consent.
- Click Create Consent.
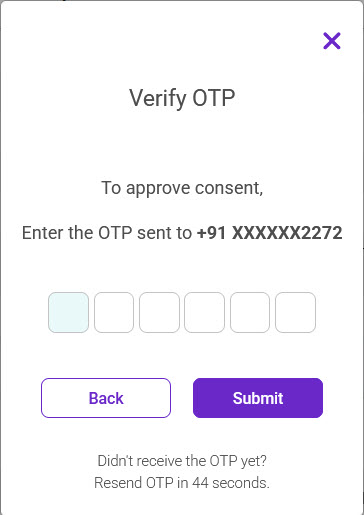
- Enter the OTP sent to the registered mobile number and click Submit.
The consent is created and it will be listed under the Self Consents.
View and Share Reports
On your mobile, you can get reports for the consents that you have created. Reports can be viewed or shared through TallyEdge mobile application only.
View and Share from Consents
- On TallyEdge mobile application, tap Consents > SELF and select the consent that you had created.
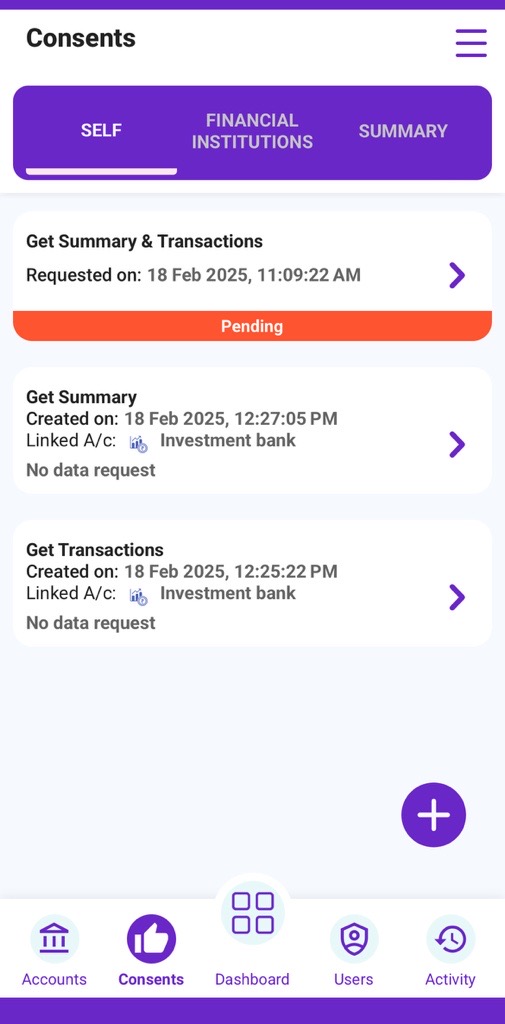
- Tap REQUEST DATA for the report that you want to view or share.
- Select the date as required, and tap REQUEST.
- Once the data is available, tap VIEW or SHARE as required.
The account information details will be solely based on the consent you had created. - Choose the File Type (PDF, Excel, or XML) as required and tap SHARE.
- Select WhatsApp, e-mail or any other supported application to share the Report.
You can also create consents from Accounts section. Refer to the Create, View and Share Reports from Accounts section on Accounts.
Financial Institution Consents
When any FIU raises a request for your consent to obtain data from any FIP, you need to approve the consent request so that the FIP can start sharing the data. You can also decide to reject the request if the requested data need not be shared. In case you do not approve or reject the consent within the time mentioned in the consent request, the request will expire.
Approve Consent Requests
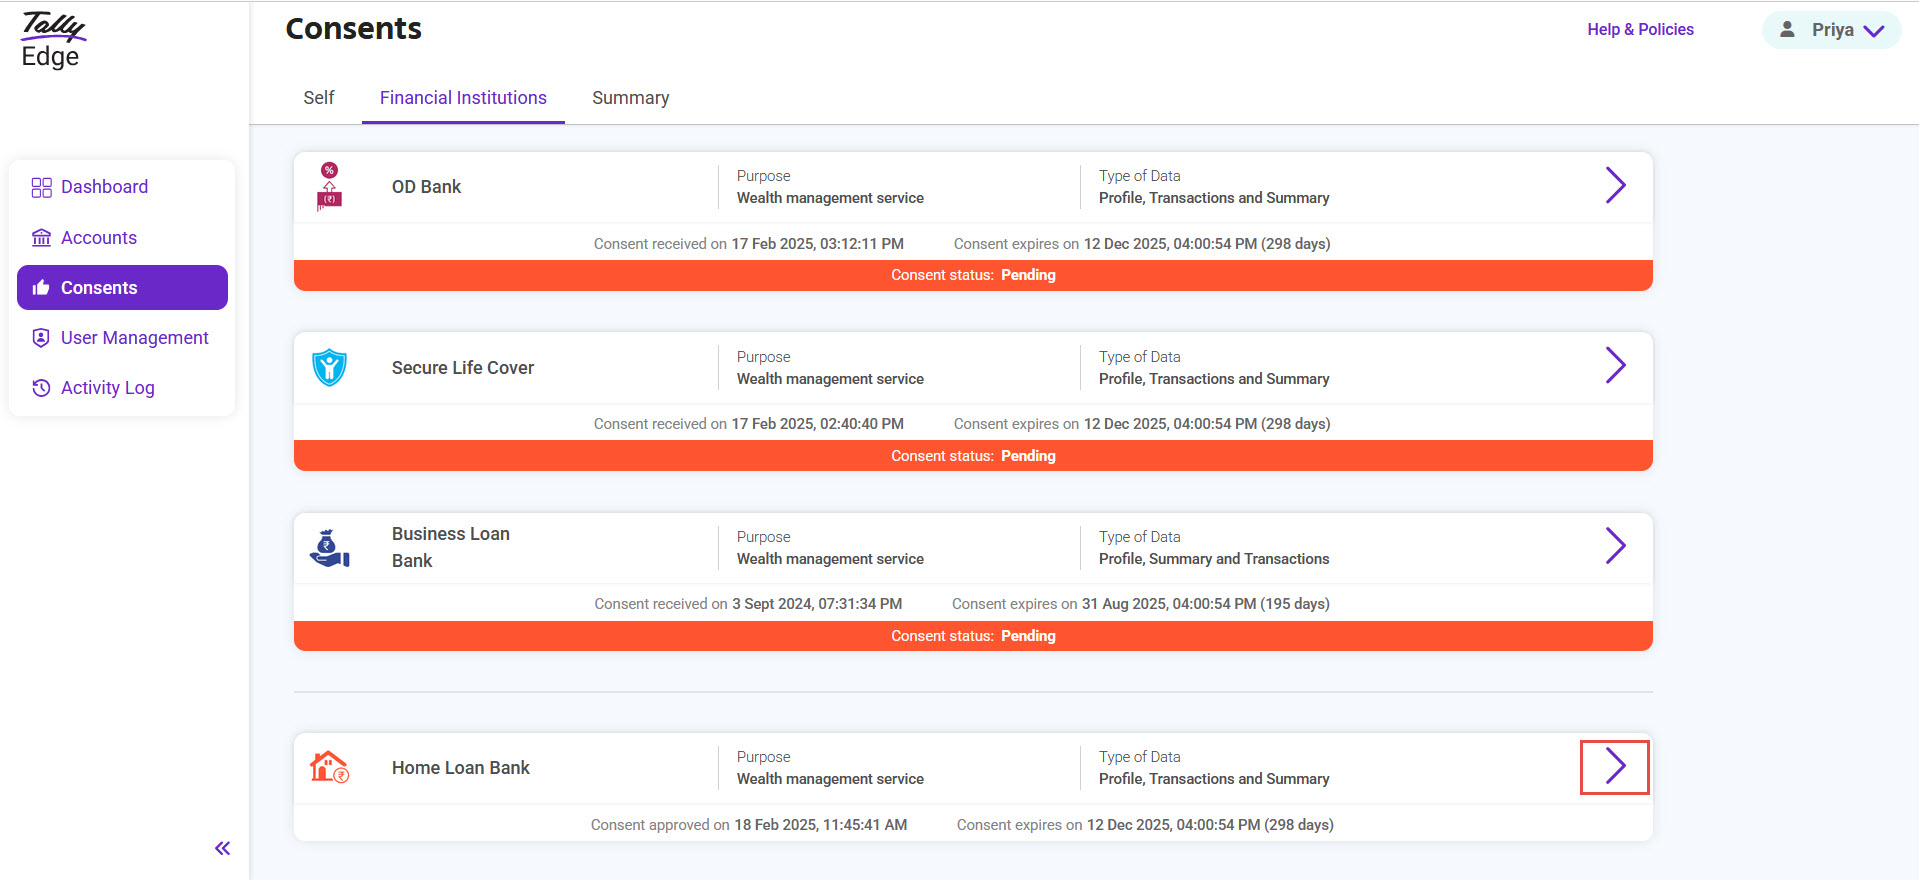
You can see the list of consents that are raised by different FIUs in the Financial Institution Consents section.
- Select Consents > Financial Institutions.
- Click > on the consent that you want to approve.

- Verify the details, if you decide to approve the request.

Consent details show the parameters requested by FIU.
-
- Type of Data: The type of financial information requested by the FIU to view or download such as Transactions, Summary, or Profile.
- Purpose: The requirement for which the consent request is sent such as Aggregated Statement. For more details, refer to ReBIT | Industry Initiatives.
- Consent validity period: The interval during which the FIU will be able to access your financial information.
- Data fetch frequency: The FIU wants to fetch the financial information according to the no. of times in a day/week/month.
- Transaction period: The period for which data needs to be shared. Information from your linked accounts will be shared based on the specified dates, transaction type, and criterion mentioned here.
- Mode of access & data life: Whether the FIU can view, download or store your financial information during the allowed period.
- Type of information: Different types of accounts with FIPs, such as Deposit and Recurring Deposit.
- Consent requested on: Date on which the consent request was received.
-
- Select the required accounts and click Approve.
If any of the required FI account is not linked, click Add Account. Refer to Accounts section to learn how to link accounts. - Enter the OTP sent to the registered mobile number and click Submit.
The consent request is approved. You can see this consent under the Financial Institution tab.
Reject Consent Requests
- Select Consents >Financial Institutions.
- Click > on the consent you want to reject.
- Verify details and click Reject, if you decide to reject the request.
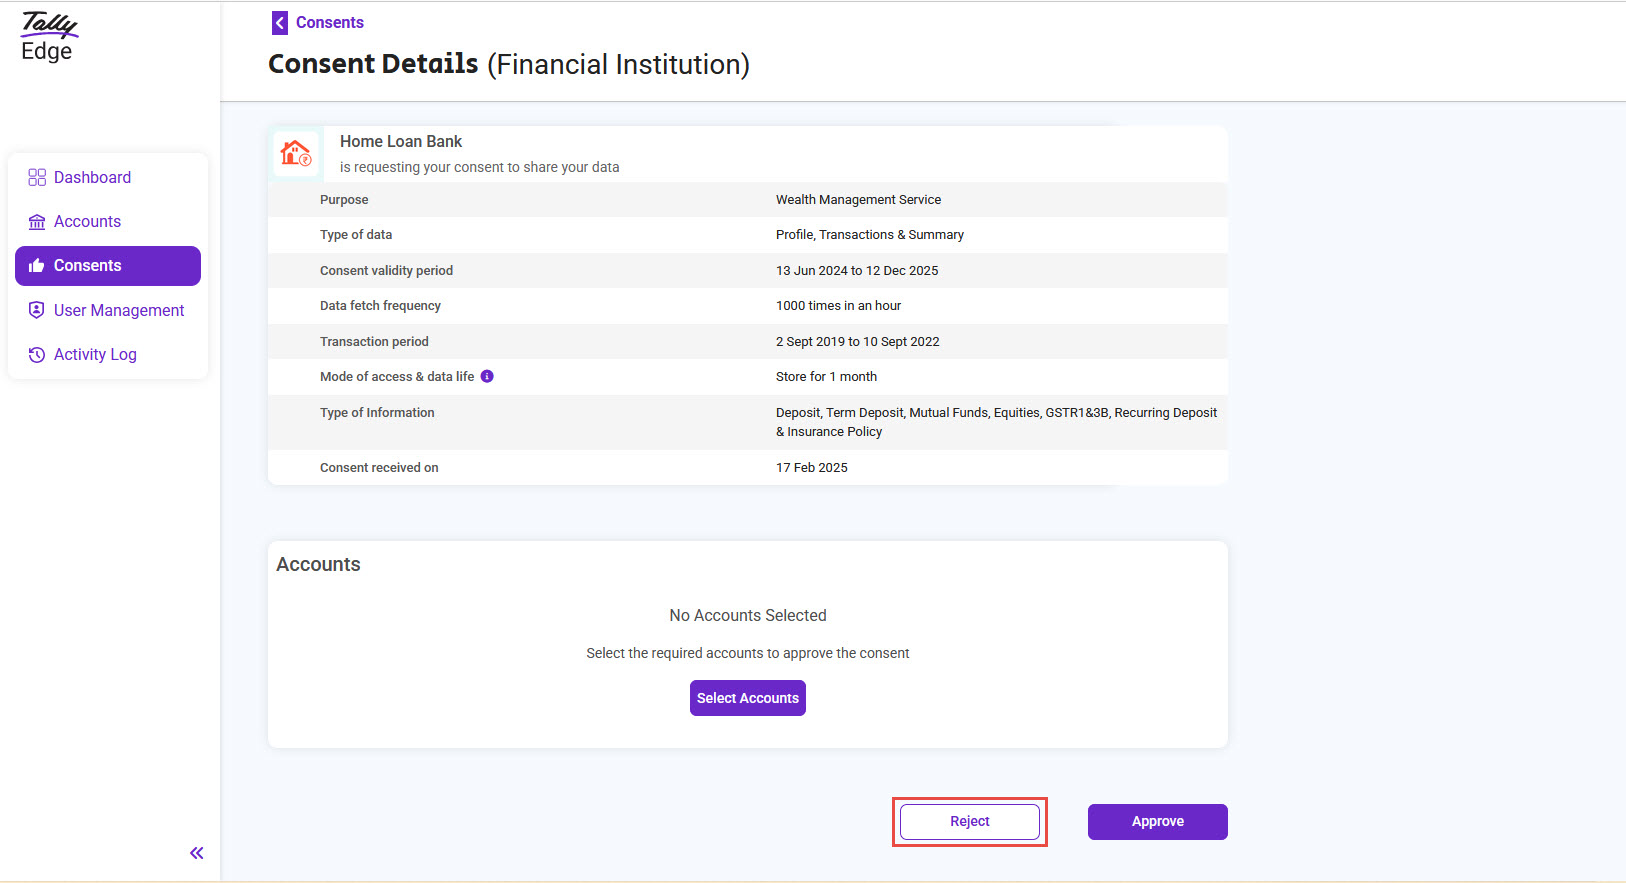
Note: If you reject the consent request, you will not be able to revert the consent request.
- Click Yes.
The consent request is rejected. You can see this consent under the Financial Institution tab.
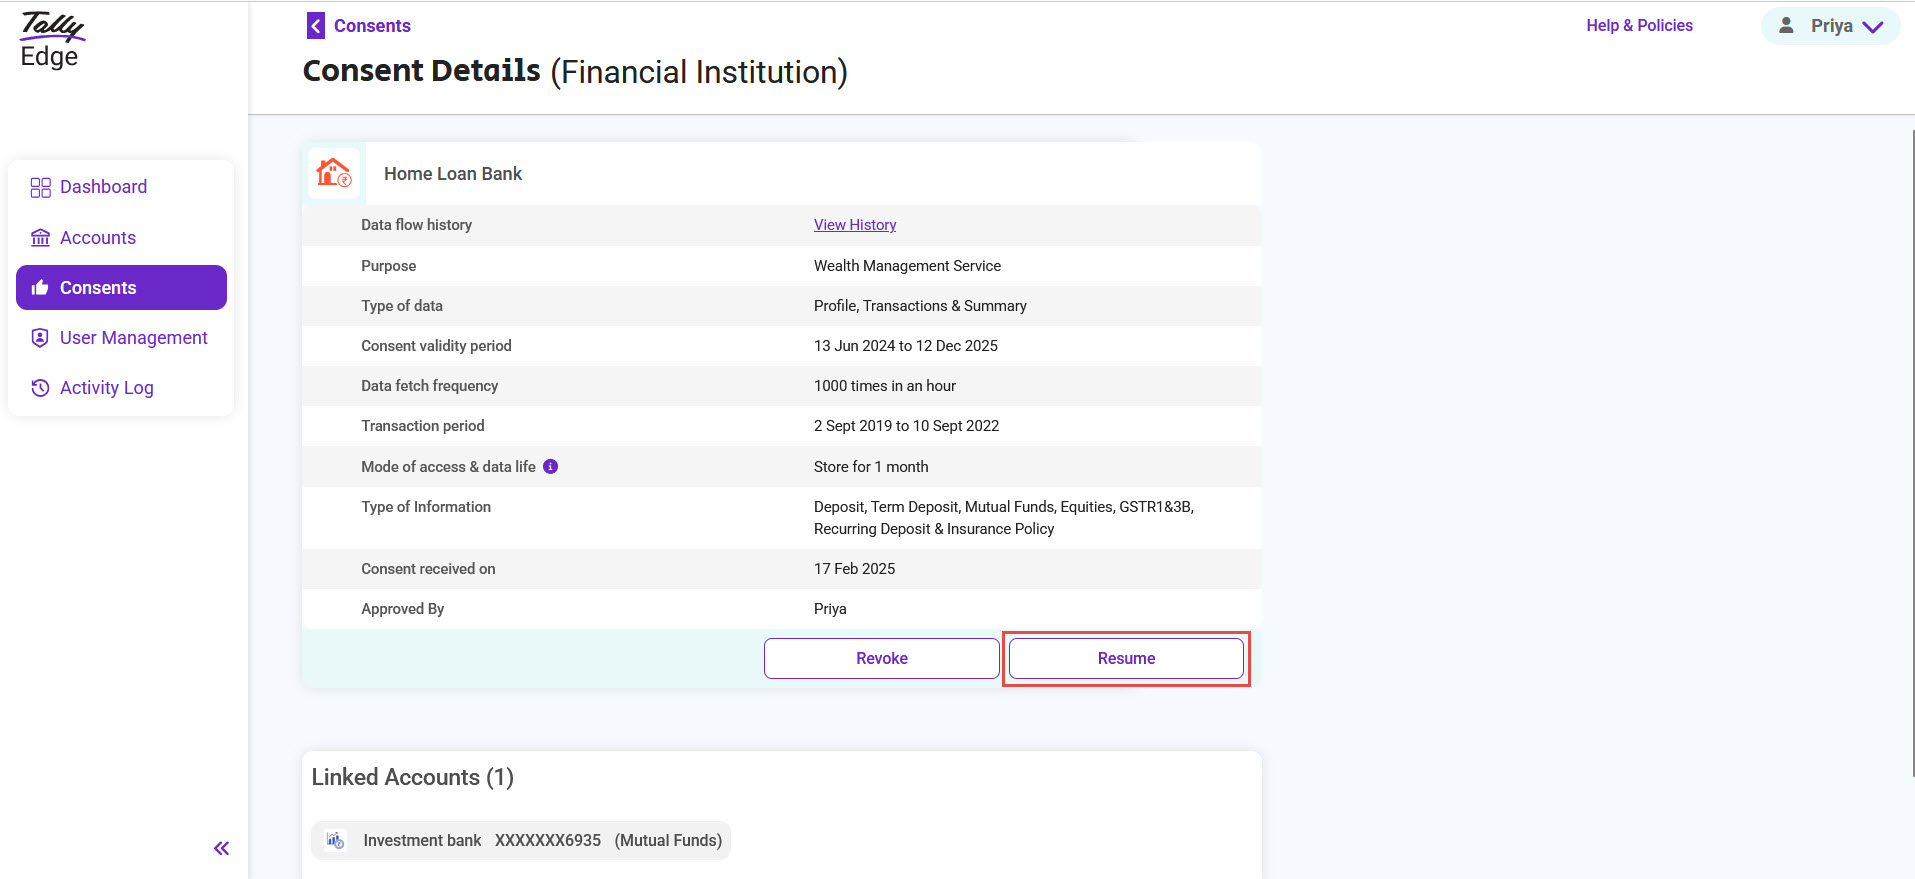
Revoke or Pause Consents and Resume Paused Consents
All consents that you have approved and the data flows are happening regularly are listed in the Financial Institutions tab. You can revoke any active consent if you want to stop sharing data with any FIU. You may pause any active consent if you want to stop data sharing for some time. You can also view the paused consents in this tab and resume the activity, if needed.
You can see the list of consents that are approved and are active. Number of consents will depend on how many you have approved.
The name of the FIU is on the top left corner of each request.
Revoke consents
- Select Consents > Financial Institution.
- Click > on the consent you want to revoke.
- Verify details of the consent and click Revoke if you decide to stop the data flow from FIP to FIU.
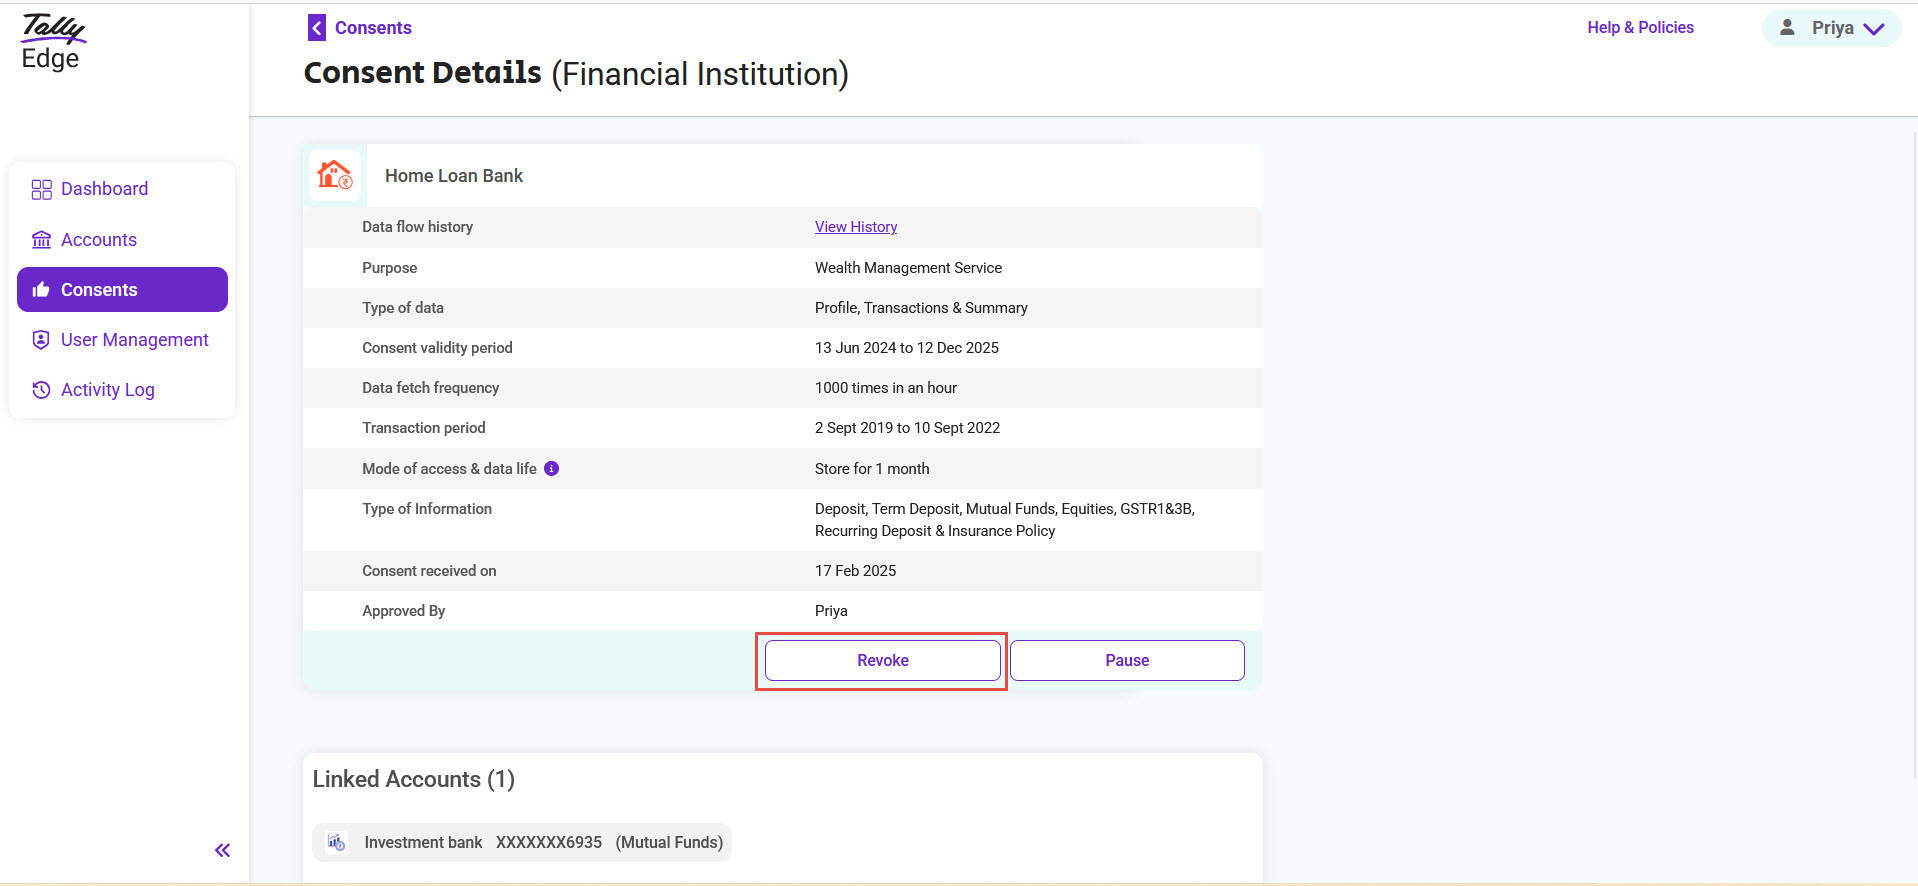
Note: If you revoke the consent, you will not be able to make the consent active again, and the data flow from FIP to FIU will be stopped for the consent.
- Click Yes.
- Enter the OTP sent to the registered mobile number and click Submit.
The active consent is revoked. You can see this consent under the Financial Institution tab.
Pause consents
- Select Consents > Financial Institution.
- Click > on the consent you want to pause.
- Verify details of the consent and click Pause if you decide to stop the data flow from FIP to FIU for some time.

Note: when you pause the consent, data flow will be paused for the consent. - Click Yes.
- Enter the OTP sent to the registered mobile number and click Submit.
The active consent is paused. The consent will continue to be displayed in the list under the Financial Institution tab. A button with the name Resume can be seen with the consent.
Resume paused consents
- Select Consents > Financial Institution.
- Click > on the paused consent you want to resume.

- Verify details of the consent and click Resume if you decide to restart the data flow from FIP to FIU.
- Click Yes.
- Enter the OTP sent to the registered mobile number and click Submit.
The paused consent is made active. The consent will continue to be displayed in the list under the Financial Institution tab.
View Data Flow History
TallyEdge shares end-to-end encrypted data, and the details of the process is maintained. No financial data is stored in TallyEdge for future use. You can view the status of the data flow.
- Select Consents >Financial Institution.
- Click > on the approved consent.
- Click View History.
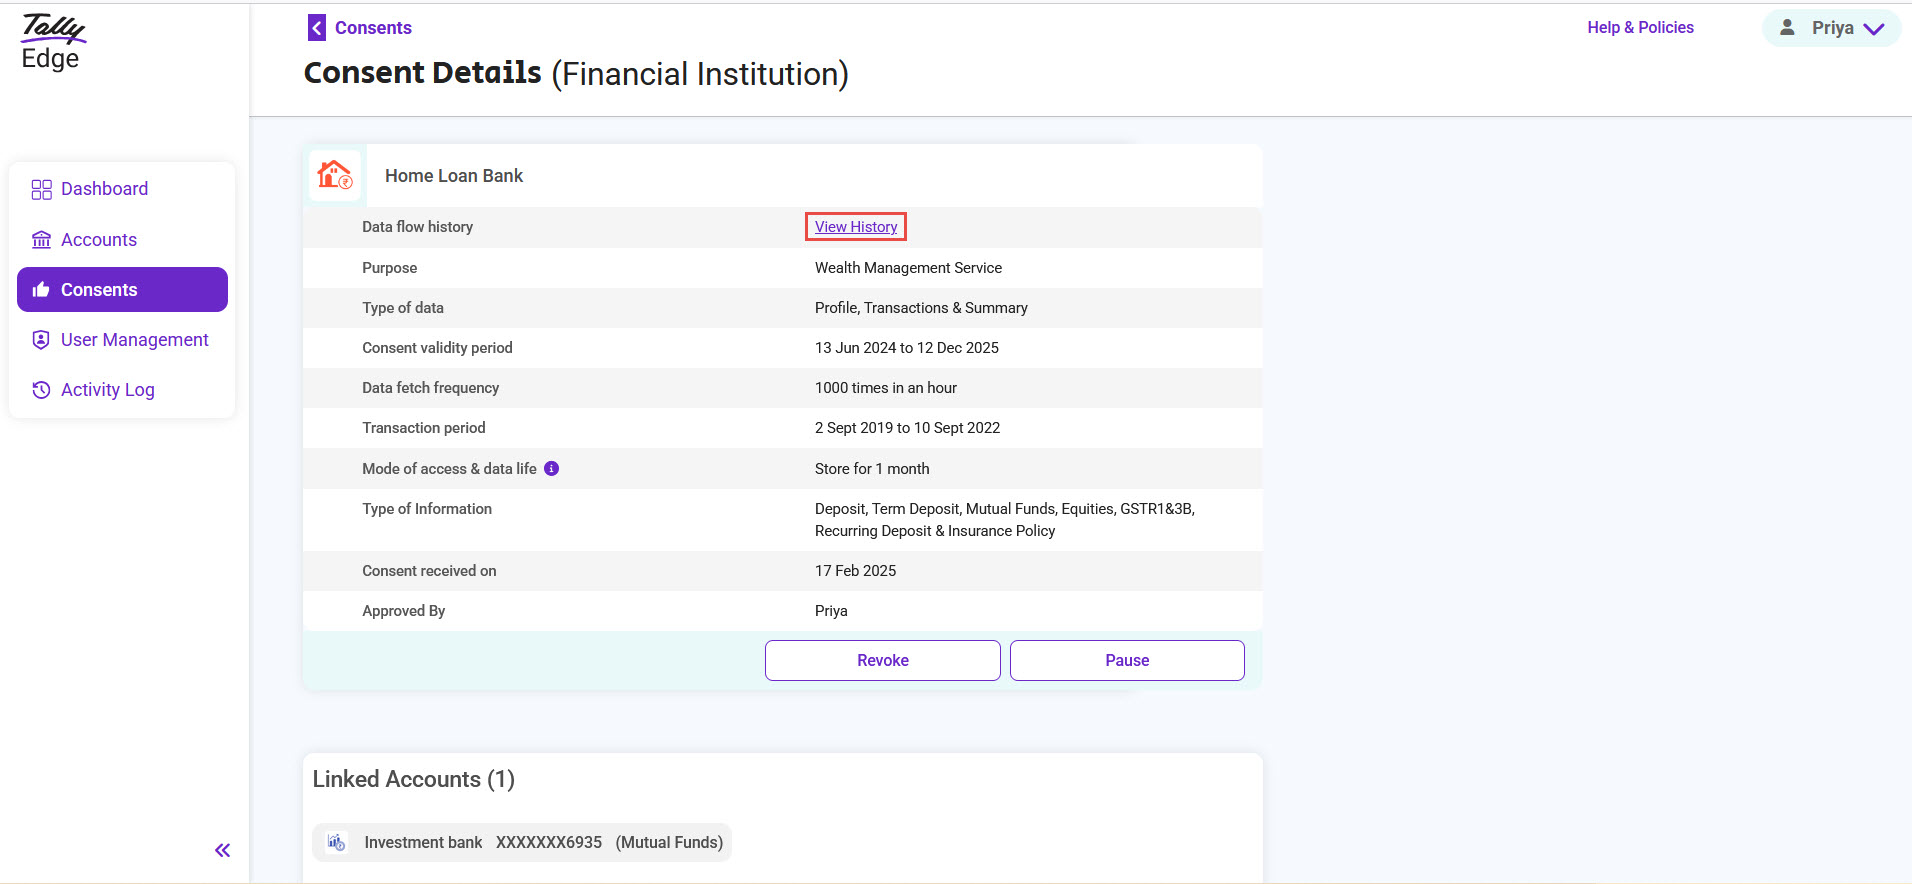
The Data Flow History for <FIU> screen appears.
- Identify the date on which you want to view the data flow history and click View.
The Data Flow Initiated on <date+time> screen appears with the status of instance of every data flow, and the details are below:
-
- Request sent: TallyEdge had sent the fetch request to FIP.
- Data fetch: Data fetching is either successful or failed.
- Notified <FIU>: TallyEdge had sent a notification to the FIU.
- Data delivered: The end-to-end encrypted data was sent to the FIU or not.
View Details of Archived Consents
The Archived Consents section
All consent requests that are rejected, revoked or expired before approval are listed in the Archived Consents section. This section is useful when you want to check details of any of the old consents that are nor more active.
The name of the FIU is on the top left corner of each request.
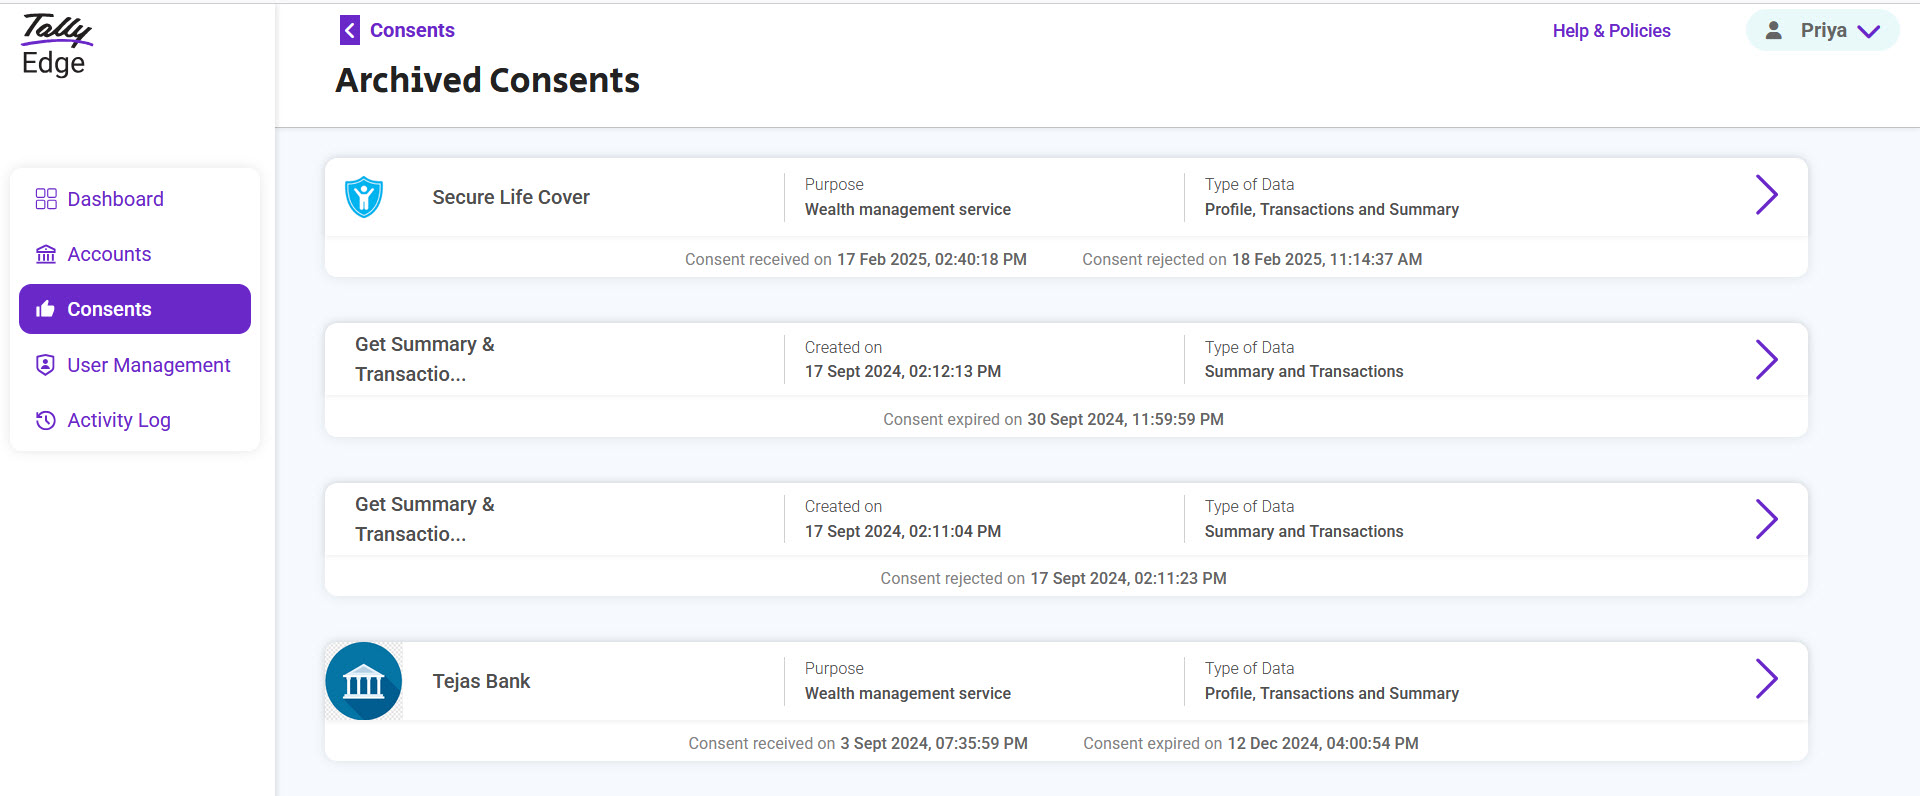
The Consent statuses are:
- Expired (without approval): No action was taken on the consent request within the specified period.
- Expired: The consent request was approved, but the next steps were not completed within the specified period. This includes cases such as the FIP missed to share your financial information to the FIU.
- Revoked: Consents approved and revoked before completing the transfer requirements.
- Rejected: Consents rejected without approval.
View consent details and linked accounts
Under the Archive tab, you can view the consent details and the linked FI Type accounts for the Consent.
- Select Consents > Summary > Archived Consents.
- Click > on the archived consent you want to view.
On Consent Details screen, you can view the details of the consent.

The details of the accounts associated with the consent are also shown in this screen.